The TON ecosystem is heating up in the gaming arena, attracting a large number of developers to join. However, from a technical perspective, issues such as EVM compatibility and development languages make it still challenging for many developers to build gaming applications based on the TON infrastructure. Zypher Network, as the most advanced blockchain game development engine, supports the expansion of Web2 games into dApps and has developed numerous plugins. It enables developers to quickly deploy games developed based on CocosCreator in the Telegram ecosystem, significantly reducing the barrier for developers to create games on the TON network.
Developer documentation: https://docs.zypher.network/blog/cocos-tg/
The New Hotspot in On-Chain Gaming: TON Ecosystem
TON (The Open Network) is becoming one of the hottest public chains recently, attracting a lot of attention in the short term through deep integration with the social platform Telegram, which has a user base of 900 million. Applications developed based on the TON infrastructure can seamlessly integrate into Telegram as "mini-programs," allowing users to directly access and use various TON ecosystem dApps through Telegram, significantly lowering the user access threshold.
At the current stage, the TON ecosystem is becoming a new hotspot for on-chain casual games. In addition to low development costs and overall low transaction costs on the TON network, on-chain games can fully utilize Telegram's massive user base for user conversion and virality. The Telegram "mini-program applications" naturally integrate with game products, enriching and expanding functionality, seamlessly supporting data storage, interactive games, and transaction payments. Based on this, on-chain game projects can utilize these features to provide diverse gameplay and economic models.
In fact, the popularity of some casual games also confirms the above points. For example, the popular click game based on Telegram, Notcoin, has attracted over 35 million users by rewarding them for clicking on the screen, while Hamster Kombat publicly disclosed that its cumulative users have reached 200 million. The cat-themed task-based casual game Catizen has attracted over 20 million users, with over 500,000 paying users. Even the subscription followers of the Notcoin imitation, Yescoin, have already exceeded 6 million users.
The synergy between on-chain casual games and the TON ecosystem is evident from user data. Since the beginning of 2024, driven by a series of popular casual games, the TON ecosystem has risen rapidly, with over 12 million on-chain wallets activated by mid-August (compared to approximately 1 million in January), and a monthly active wallet count of 4.2 million (compared to around 300,000 in January).
Currently, the TON ecosystem has also attracted a large number of Web2 and Web3 game developers, hoping to capture early dividends from the massive attention system.
Technical Barriers of the TON Network
In fact, TON uses a virtual machine called TVM (TON Virtual Machine), which mainly supports the Fun C smart contract programming language and the TVM instruction set (although Fun C looks similar to the C language, it is generally not well known or advocated). These languages and virtual machine architecture differ significantly from Ethereum's EVM and Solidity programming language. At the same time, TON's design includes a multi-threaded blockchain architecture, allowing different shard chains to run in parallel. This design can improve network performance but also increases the complexity of development. Developers need to understand how to effectively coordinate data and logic among multiple shards, which is more challenging than traditional single-chain architectures.
Therefore, whether for Web2 developers or Web3 developers, there are more or less certain development barriers when dealing with the TON infrastructure.
Zypher Network
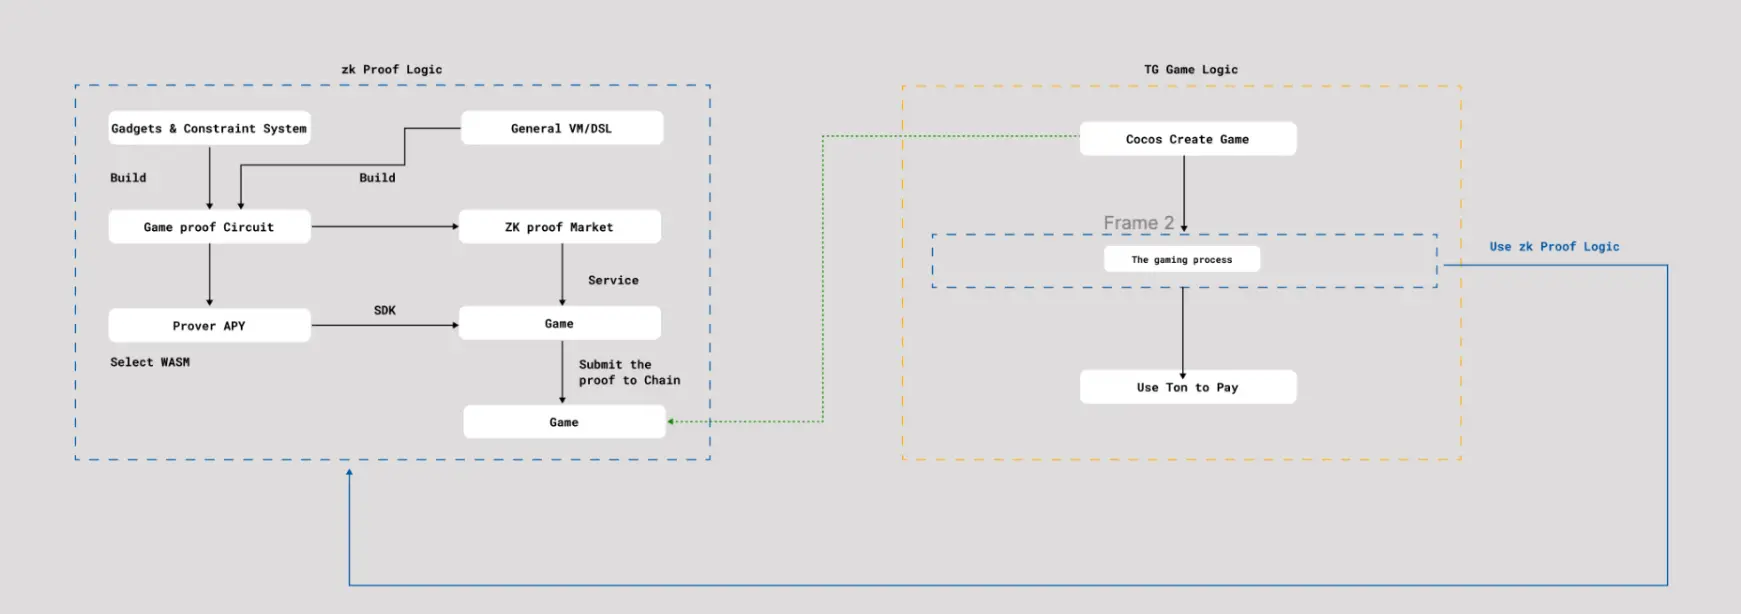
Zypher Network is a new generation game engine solution with zero-knowledge proof technology at its core. It helps developers enter the blockchain field more easily and extends on-chain functionality in a modular and pluggable manner, significantly lowering the barrier for developers to build blockchain games. At the same time, Zypher Network further builds a set of underlying game facilities that can serve on-chain games based on existing on-chain infrastructure and provide perfect support for decentralized game operations.
Currently, Zypher Network has launched a Services SDK toolkit for developers, allowing them to directly utilize "inherent" zero-knowledge functions in a pluggable manner, such as Shuffle and Rollup, without needing to understand the complexity of zero-knowledge circuits. This user-friendly approach can be implemented immediately, greatly simplifying the development process. Additionally, the toolkit provides various small tools and circuits that developers can "assemble" with minimal coding effort, similar to building with LEGO bricks. The modular approach allows for the creation of custom circuit logic to meet specific requirements. Developers can start with basic operations and gradually build more complex logic to meet their needs.
Furthermore, to adapt to the majority of chain standards and for game logic writing, the framework also supports domain-specific languages (DSL) and zero-knowledge virtual machines (ZKVM), and provides a chain verification SDK customized for these systems to offer more flexibility and customization options.
With the aforementioned development toolkit, developers can deploy applications on different chains with low barriers based on their familiar languages, and ensure efficient and low-cost game operation based on Zypher Network's zk technology solution. Some Web2 games can even be directly expanded into dApps based on the engine and deployed on-chain.
At the same time, to provide a user-level zk experience, Zypher has introduced an economic model centered around token "staking," where players and on-chain validators (network miners) can capture resources from the network by staking Zypher tokens.
- From the miner's perspective, the Zypher Network will delegate zkp tasks to them (helping games on the network perform zero-knowledge verification and upload it to the corresponding chain). Miners with more staked Zypher tokens have stronger parallel processing capabilities for zero-knowledge tasks and receive higher rewards for each task completed.
- From the player's perspective, by staking Zypher tokens, they can participate for free in high-quality on-chain games. The more tokens staked, the faster the game proof generation and the better the game experience, with the potential to receive more rewards.
With the incentivized staking economic model, more validators are motivated to participate in network operations, further improving network efficiency. Players can actively participate in different games with the incentive boost provided by staking, capturing active users for high-quality games on a larger scale.
Currently, Zypher Network can support developers in using Cocos Creator to develop games and quickly deploy them on the TON chain. Below is the first part of the deployment tutorial on how to quickly deploy games developed based on Cocos Creator to Telegram.
Beginner's Guide: Rapidly Deploy TON Games Using Cocos Creator in Five Minutes (Part One)
1. Understanding Cocos Creator
Official website
- Cocos Official Website: https://www.cocos.com/
Documentation address
- Cocos Creator Documentation: https://docs.cocos.com/creator/manual/en/
- Cocos Creator API Reference: https://docs.cocos.com/creator/api/en/
Forum Address
- Official Cocos Forum: https://forum.cocos.org/
2. Introduction to Cocos Creator Versions (1.x is almost obsolete, most are 2.x, 3.x has more 3D games)
Cocos Creator is a complete game development solution that provides an integrated development environment supporting both 2D and 3D game development. It adopts a component-based and data-driven workflow, simplifying the complexity of game development. It is based on the Cocos 2d-x engine and has strong extensibility and flexibility.
Key features include:
- Component-based design: Developers can quickly build game logic by dragging and dropping components.
- Cross-platform support: Supports export to multiple platforms, including Web, iOS, Android, Windows, Mac, and more.
- Rich editing tools: Provides scene editor, animation editor, particle editor, code editor, and more.
- Script support: Mainly uses JavaScript and TypeScript to write game logic.
Major Versions of Cocos Creator and Their Differences
Cocos Creator 1.x Series
Cocos Creator 1.x is the earliest version of Cocos Creator, with the following main features:
- Basic functionality: Basic scene editing, component system, animation editor.
- JavaScript support: Mainly uses JavaScript as the scripting language.
- Basic plugin system: Allows developers to extend the editor's functionality.
- Web and native platform support: Can be exported to Web and native platforms (iOS and Android).
Cocos Creator 2.x Series
The Cocos Creator 2.x series introduces many improvements and new features:
- Performance optimization: Improved engine performance, especially on mobile devices.
- TypeScript support: Introduces TypeScript support, enhancing code maintainability and type safety.
- Physics engine integration: Built-in Box2D and Chipmunk physics engines, supporting 2D physics effects.
- Resource management optimization: Improved resource management system for more efficient resource loading and management.
- Enhanced UI system: Improved UI components and layout system, providing more powerful UI editing capabilities.
Cocos Creator 3.x Series
The Cocos Creator 3.x series is a major version update with the following key features:
- 3D support: Fully supports 3D game development, providing rich 3D features and editor tools.
- Unified engine architecture: Integrates 2D and 3D engines, providing a consistent API and workflow.
- Rendering engine update: Introduces a brand-new rendering engine, supporting PBR (physically based rendering), global illumination, shadows, and other advanced effects.
- Enhanced animation system: Provides more powerful animation editing and playback capabilities, supporting complex animation effects.
- Optimized cross-platform support: Further optimizes the export and publishing process, supporting more platforms and devices.
- Enhanced editor: Provides richer editor plugins and extension mechanisms, enhancing developer productivity.
3. Starting the Source Code Project (if you have purchased source code) - Specific details can be found in the documentation
1. Install Cocos Creator
If you haven't installed Cocos Creator yet, go to the official Cocos website to download and install the latest version.
2. Open Cocos Creator
After installation, launch the Cocos Creator editor.
3. Open the Project
- Import the Project:
- In the Cocos Creator startup interface, click the "Open Project" button.
- Browse to the source code folder of your Cocos Creator project, select the folder, and click "Select Folder".
- Check Project Configuration:
- After successfully opening the project, check the assets folder to ensure all resource files are in the correct location.
- Check Project -> Project Settings to ensure the project's resolution and other settings meet your requirements.
4. Run the Project
- Select the Scene:
- In the assets folder, find your main scene file (usually ending with .fire or .scene).
- Double-click the main scene file to open it in the editor.
- Run the Project:
- Click the "Play" button (green triangle) at the top of the editor to preview and run the project in the editor.
- If the project runs normally, you will see the game screen in the editor's game window.
5. Build and Publish the Project to Web Mobile
Open the Build Panel:
- In the top menu bar of the editor, select Project -> Build.
Select Platform:
- In the build panel, choose Web Mobile as the target platform.
Set Build Options:
- Build Path: Set the output folder path for the build.
- Start Scene: Select the scene to be loaded when the game starts.
- Main Bundle Compression Type: Choose the compression type (e.g., None, Zip, JPG).
- Zip Compression Level: If Zip compression type is selected, you can set the compression level.
- MD5 Cache: Enable MD5 caching to add MD5 hash values to all resource files for version control and cache management.
- Source Maps: Generate Source Maps files for debugging.
- Debug Mode: Enable debug mode to retain debug information and log output in the published code.
- Inline all Sprite Frames: Inline all sprite frames into one file.
- Merge all JSON Files: Merge all JSON files into one file.
Build the Project:
- Click the Build button to start building the project.
- After the build is complete, the build output files will be generated in the specified build path.
Publish the Project:
- Upload the generated build output files to a server that supports HTTPS, such as GitHub Pages, Netlify, Vercel, or other static website hosting services.
6. Debugging and Optimization
- Enable Source Maps:
- Enable the Source Maps option in the build panel to generate Source Maps files for debugging the published code.
- After publishing, you can use Source Maps to debug the code in the browser's developer tools.
- Enable MD5 Cache:
- Enable the MD5 Cache option in the build panel to add MD5 hash values to all resource files.
- This ensures that users do not load old resources due to caching issues when updating the game.
- Debug Mode:
- Enable the Debug Mode option in the build panel to retain debug information and log output.
- If debugging is needed during the publishing process, this option can be enabled in the build panel.
7. Testing the Project
- Local Testing:
- Test the build output files on a local server to ensure the game's performance and compatibility across different browsers.
- Tools such as VS Code's Live Server plugin or other local server tools can be used for testing.
- Online Testing:
- After uploading the build output files to the server, test the online version to ensure all functions are running properly.
By following these steps, you can successfully launch and publish a Cocos Creator project source code to the Web platform and understand the configuration and usage of publishing properties such as debug mode and MD5 cache.
Four, Deployment Instructions for the Backend Go Part of "Protect Trump" as an Example
"Protect Trump" is a small game developed by Zypher Network in collaboration with a third-party development team. The game is deployed on TON using the Zypher Network underlying engine.
1. Create a new scene, add a node to the scene, and attach the script GameLanch.ts.
(I also placed the background image of the main interface to load in advance, which is optional.)
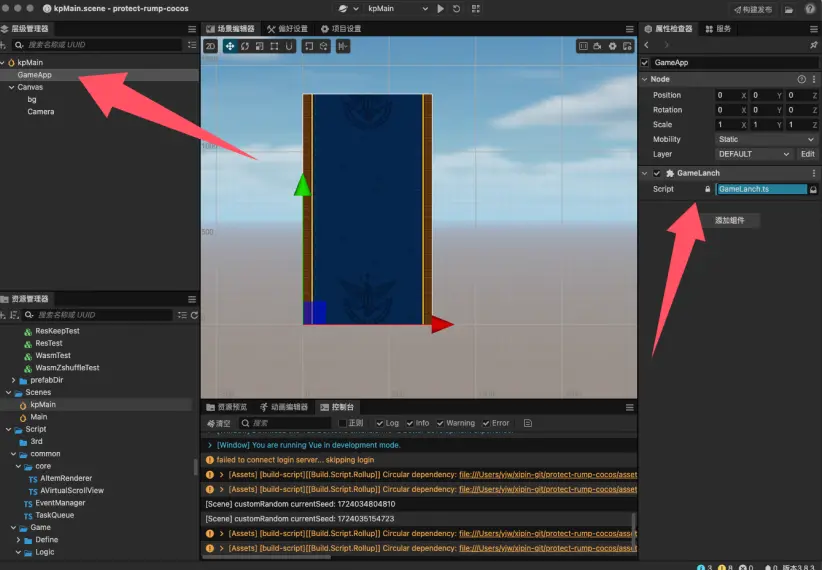
- GameLanch.ts:
// Manage global data
PlayerModel.inst.init();

// Initialize the game framework
this.node.addComponent(ResMgr);
this.node.addComponent(UIConfig);

// End
this.node.addComponent(GameApp);
Configure page information in the UIConfig.ts file and control UI using the ui Manager interface.
uiManager.open(UIID.UILoading);
- Telegram Data Retrieval
Add the following script to the index.html file in the template folder build-templates/web-mobile.
<script async src="https://telegram.org/js/telegram-web-app.js"></script>
Also, add the relevant import in the game script for ease of use in debug mode.
// Create and insert the Telegram Web App SDK script
loadTelegramSDK() {
    return new Promise<void>((resolve, reject) => {
        if (window['Telegram'] && window['Telegram'].WebApp) {
            console.log('Telegram SDK already loaded:', window['Telegram']);
            window['Telegram'].WebApp.ready();
            resolve();
            return;
        }
        const script = document.createElement('script');
        script.src = 'https://telegram.org/js/telegram-web-app.js';
        script.onload = () => {
            console.log('SDK loaded successfully:', window['Telegram']);
            window['Telegram'].WebApp.ready();
            resolve();
        };
        script.onerror = error => {
            console.log('SDK loading failed:', error);
            // SDK loading failed
            reject(error);
        };
        document.head.appendChild(script);
    });
}
reject(error); document.head.appendChild(script); });
}
processInitData() { const initData = window['Telegram']?.WebApp?.initData;
if (initData) { const searchParams = new URLSearchParams(initData); const WebAppData = {};
for (const [key, value] of searchParams.entries()) { WebAppData[key] = value; }
console.log('WebAppData:', WebAppData);
// Get user information const user = window['Telegram'].WebApp.initDataUnsafe; console.log('User:', user);
// this.WebAppData = WebAppData;
// Handle window resize window['Telegram'].WebApp.onEvent('resize', function() { // Update UI console.log('Update UI:'); });
this.tgInitData = initData; } else { console.warn('Telegram WebApp initData is not available.'); } }
async initTelegram() { try { await this.loadTelegramSDK(); this.processInitData(); } catch (error) { console.error('Failed to load Telegram SDK:', error); } }
Send the obtained window['Telegram']?.WebApp?.initData to the server for validation.
4. Briefly explain "rank"
Add the script UIRank.ts to the rank page. After UIRank inherits the UIView class, it can be managed by the uiManager.
export default class UIRank extends UIView {
    // Get the ranking data
    let ranksRes = await Http.getAllCoinsRank(PlayerModel.inst.tgInitData);
    this.list.refreshData(ranks); // Display in the component
}
5. Briefly explain "reward"
The interface mainly has 3 scripts attached:
UIReward.ts: Controls the reward and invitation list pages. RewardTabCtrl.ts: Controls the display content of rewards and invitations. InviteTabCtrl.ts: Controls the display of the invitation list.
Refer to the specific content in the scripts.
Share code:
onCopy() {
    let linkUrl = PlayerModel.inst.link?.invite_link;
    this.tg_link.string = linkUrl;
    // Copy the invitation link to the clipboard
    this.copyToClipboard(linkUrl + "Hey there! I just found this awesome Telegram game called Protect T-RUMP! Join me in defending Trump from various threats during the campaign. We can hire and train bodyguards, complete exciting missions, and team up with friends to keep Trump safe. Click now to earn even more rewards! �✨");
    uiManager.open(UIID.CopySuccess);
}

onInvite() {
    let linkUrl = PlayerModel.inst.link?.invite_link;
    // Copy the invitation link to the clipboard
    this.copyToClipboard(linkUrl);
    this.onShareButtonClicked(linkUrl, 'Hey there! I just found this awesome Telegram game called Protect T-RUMP! Join me in defending Trump from various threats during the campaign. We can hire and train bodyguards, complete exciting missions, and team up with friends to keep Trump safe. Click now to earn even more rewards! �✨');
}

onShareButtonClicked(url, text = '') {
    const shareUrl = 'https://t.me/share/url?url=' + encodeURIComponent(url) + '&text=' + encodeURIComponent(text);
    window.open(shareUrl, '_blank');
}
6. Modify the startup page, modify the startup page in the template.
Mainly modify index.html and application.js Add a background image and progress bar.
7. Publish the game
[https://docs.cocos.com/creator/3.8/manual/en/editor/publish/publish-web.html](https://docs.cocos.com/creator/3.8/manual/en/editor/publish/publish-web.html)

[https://docs.cocos.com/creator/3.8/manual/en/editor/publish/custom-project-build-template.html](https://docs.cocos.com/creator/3.8/manual/en/editor/publish/custom-project-build-template.html)

Refer to these two documents. Currently, manual publishing is being done, and command-line publishing can be done in the future. Don't forget about MD5 when officially launching.

#### V. Explanation of the backend Go code for Protect Trump

#### 1. Overview

Protect Trump game is a backend application based on the Go language and GORM framework. It is mainly used to handle user login, game interaction, and reward collection for Telegram Web application users. The application communicates with the frontend through multiple RESTful API interfaces and uses PostgreSQL database to store and manage user data, bodyguards, buffs, and reward information.

#### 2. Directory Structure

.
├── handlers # Functions for handling HTTP requests
├── middlewares # Middleware for validating Telegram data
├── models # Database model definitions
├── tasks # Scheduled tasks, such as leaderboard updates and cleanup tasks
├── utils # Utility functions, such as extracting Telegram user data
└── main.go # Entry point of the application

#### 3. Environment Configuration

DB_HOST = localhost
DB_USER = your_db_user
DB_PASSWORD = your_db_password
DB_NAME = your_db_name
DB_PORT = 5432
DB_SSLMODE = disable
DB_TIMEZONE = Asia/Shanghai
TG_BOT_TOKEN = your_telegram_bot_token
PORT = 8080

#### 4. Database Configuration and Migration

The application uses GORM for database operations and automatically migrates the following data models at startup:

- User: User information, including Telegram ID, username, coins, etc.
- Bodyguard: Bodyguard information, associated with users.
- Buff: Buff effects, associated with bodyguards.
- CoinRecord: Coin records.
- InvitedUser: Information of invited users.

In the main.go file, the following code is used to connect to and migrate the database:
go dsn := "host=" + os.Getenv("DBHOST") + "user=" + os.Getenv("DBUSER") + "password=" + os.Getenv("DBPASSWORD") + "dbname=" + os.Getenv("DBNAME") + "port=" + os.Getenv("DBPORT") + "sslmode=" + os.Getenv("DBSSLMODE") + "TimeZone=" + os.Getenv("DB_TIMEZONE")
db, err := gorm.Open(postgres.Open(dsn), &gorm.Config{}) if err != nil { log.Fatalf("Failed to connect to the database: %v", err) }
db.AutoMigrate(&models.User{}, &models.Bodyguard{}, &models.Buff{}, &models.CoinRecord{}, &models.InvitedUser{})
#### 5. Scheduled Tasks

The application includes two scheduled tasks:

1. **Cleanup Task**: Runs every 5 minutes to clean up invalid or expired data.
2. **Leaderboard Update Task**: Runs every minute to update the user's coin leaderboard.
go tasks.StartCleanupTask(db, time.Minute5) tasks.StartLeaderboardUpdateTask(db, time.Minute1)
#### 6. Middleware

**1. AuthMiddleware**

- **Description**: Used to validate the Telegram initialization data in the request.
- **Parameters**:
    - next: The next handler
    - botToken: Telegram bot token


func AuthMiddleware(next http.HandlerFunc, botToken string) http.HandlerFunc {
    return func(w http.ResponseWriter, r *http.Request) {
        body, err := io.ReadAll(r.Body)
        if err != nil {
            http.Error(w, "Invalid request body", http.StatusBadRequest)
            return
        }
        defer r.Body.Close()

        var req struct {
            TelegramInitData string `json:"telegram_init_data"`
        }
        if err := json.Unmarshal(body, &req); err != nil {
            http.Error(w, "Invalid request body", http.StatusBadRequest)
            return
        }

        if !validateTelegramData(req.TelegramInitData, botToken) {
            http.Error(w, "Invalid Telegram data", http.StatusUnauthorized)
            return
        }

        r.Body = io.NopCloser(bytes.NewBuffer(body))
        next.ServeHTTP(w, r)
    }
}
VI. Detailed Steps for Creating Telegram Bot and Web App
1. Create Bot
Search for BotFather
- Open Telegram and search for BotFather, the official bot management tool for Telegram.
Start a Conversation
- Type /start to initiate a conversation with BotFather.
Create a New Bot
- Type /newbot to create a new bot.
Enter Bot Name
- Choose a name and enter "protectRump".
Enter Bot Username
- The username must end with "Bot" or "_bot", for example: protectRumpBot.
Save Token
- After successful creation, BotFather will generate an API Token. Save this token for later steps.
2. Create Web App
Start Web App Creation
- Type /newapp in BotFather to create a new Web App.
Select Bot
- Choose the bot you just created, for example, protectRumpBot.
Enter Web App Name
- Enter the name of your Web App.
- Modify the description of the web app, i.e., the content of "What can this bot do?".
Upload Image
- Upload a 640x360 image as the icon for the Web App.
- Modify the bot's profile picture.
Upload GIF
- Upload a GIF file. If not available, type /empty to skip this step.
Enter Web App URL
- Enter the URL of your game, for example, https://protect-rump.zypher.game/.
Enter Short Name
- Choose a short name for the Web App link, for example, protectRump.
Completion of Creation
- After successful creation, you will receive the link to your Web App, for example, me/protectRumpBot/protectRump.
By following these steps, you have successfully created a Telegram Bot and Web App. Next, you can integrate the game into your Web App and interact using Telegram's Web App interface.
3. Testing Environment Configuration
https://core.telegram.org/bots/webapps#using-bots-in-the-test-environment
(Under construction)
Summary
Cocos Creator, as a leading game editor, is increasingly being adopted by developers. Its powerful features, familiar development environment, flexibility, and extensive cross-platform support make it highly favored in the game development field. Zypher Network, through its compatibility with Cocos Creator and integration with the TON network, is significantly reducing the barriers for game developers to deploy and migrate applications to the TON network, further simplifying complex issues. After successful deployment of the game, it provides support for smoother and cost-effective operation based on zero-knowledge proof solutions.
As Zypher Network expands into more on-chain ecosystems, it will become the most important game infrastructure in the Web3 era.
免责声明:本文章仅代表作者个人观点,不代表本平台的立场和观点。本文章仅供信息分享,不构成对任何人的任何投资建议。用户与作者之间的任何争议,与本平台无关。如网页中刊载的文章或图片涉及侵权,请提供相关的权利证明和身份证明发送邮件到support@aicoin.com,本平台相关工作人员将会进行核查。


